
Hiding in the shadows of a spellbinding party is never very wonderlandiful. No one is having fun spending the night alone in the dark. Ready to howl at the moon? Let these understated, yet wicked cool wedges lead your way to a night of Hat-tastic fun!


Difficulty: Easy-medium (they do take a while to make)
Materials:
Wedge boots
Blue tape
Felt tip pen
Tracing paper
Pencil
Pencil
Sewing pins
Ruler
Scissors
Thibra
Heat gun
Black paint
Primer
Primer
Sandpaper
Black faux leather
Needle
Thread
Red shoe laces
Red fabric
Candle
Red shoe laces
Red fabric
Candle
Every once upon a time my fairy godmother grants my shoe wishes! These wedge boots were the perfect match of affordable, the right colour, and style! This was one bit of destiny this rebel couldn't ignore!
If you started with a less than perfect pair of shoes check out my other posts for ideas about how to alter them.

Since I got to hop skip and jump over painting my shoes, I decided to try out a new material called Thibra. It's a type of thermoplastic, but unlike Worbla, it is supposed to be smoother and require less priming and sanding. I really didn't want to ruin my black shoes with Gesso spray, so it seemed like a hexcellent opportunity. If you can't find Thibra, you should be able to use Worbla. Just follow the path through the woods in Darling's shoetorial. You might also want to try matching your tea party look to Briar's with some Magic Sculpt
If you would like a compare and contrast of Thibra & Worbla before you start to writing your own story, skip to the last chapter in this post.
Begin by covering half of the wedge with blue tape (I didn't want to get a mess on my shoe), and sketch out the design. If you plan on painting you can always draw straight on the heel. Next pin tracing paper over the design and trace the lines. Also remember to trace the edge of the sole to help place the design later.

Tape a piece of tracing paper over the printed patterns. Place aside.
Next, cut strips of Thibra in varying widths to use for spirals. Mine are all in increments of .25" which is why my pattern has numbers like 1, 2, 4 on it. So 2 is 2x .25, so 1/2" wide strip. I wrote it on my pattern so I wouldn't forget and everything would match.
Once there are enough strips cut, heat them up with a heat gun and roll.
**Always use caution around a heat gun! **
Like with any stroll through the woods, stay alert! You don't want to get burned.
Use a ruler to roll the Thibra. It helps keep the rolls even. Make sure not to get the Thibra too hot, it tends to stick. Remember Thibra requires less heat than Worbla before it is workable. I usually work on a large piece of scrap wood and didn't have much trouble with it sticking as long as I didn't overheat the material.Like with any stroll through the woods, stay alert! You don't want to get burned.

Personally, I found the Thibra to be very touchy. This is both a good and a bad thing. It was helpful in sculpting small details, but it also drove me a nuts because I kept accidentally taping it and it would get thrown wildly out of shape. So be careful when sculpting.
Once all the designs are finished reheat them a bit and lay the tracing paper on top of the shoe. The paper backing will help mold the shapes to the curves without them getting too wonky. I tried this first without the tracing paper (see below), but the Thibra stuck to the paper and tore the sheet. It should peel off the tracing paper and as a bonus you can see the shoe through it!

After the design has cooled completely, remove the tracing paper and place the design back on the shoe.
Reheat the design slowly, allowing it to stick to the heel. Since this material has such a low working temp, it is really easy to overheat bits without realizing it. The cooler it is to start, the less you have to worry. Before moving on to the other side of the shoe allow everything to cool.
After the Thibra has cooled completely, start sanding any imperfections. I found that if I used a very fine grit paper most of the imperfections came out without having to use Gesso.
Since the material is so slick, sand it slightly even if the design came out story book perfect. The paint will not adhere well if the surface is left smooth.

Time to carefully paint the swirls. Start with a coat of primer and then move onto your final colour. I choose black chalkboard paint because it matched the sheen of the rest of my shoes. I also stippled the final coat to help match the texture of the rest of the boot. When the swirls are left too smooth they look like they were glued on after, if they have a similar texture they appear more part of the shoe. It is very subtle, but I felt it made a difference.
With the wedge done, begin prepping the bow. I choose to use fabric Joann's calls Peachskin because I wanted very soft yet opaque bows. The fabric is light weight, has a nice drape and is 100% polyester. The fiber content is very important because I choose to melt the fabric instead of machine sew the edges. Should you follow the path in the next steps make sure you have 100% polyester fabric, or another 100% synthetic fiber that will melt.
Mark the fabric how wide/long the bow strips should to be. Snip the edge along these marks and tear for a perfectly straight line. Do note that tearing doesn't work on all fabrics, test it first. Cut out the V shapes in the tail ends. Next pull away any long threads. Then carefully run the edges of the fabric over a lit candle.
** Be extremely careful with open flames.**
Be aware of your fiber content, ie what your fabric is made of. Natural fibers will burn not melt, and you don't want your shoes to go up in flames! It's hard to run away from danger barefoot! Always test, and always use extreme caution.
To finish the bows follow the instructions found on Apple's fableous shoes, but do not sew the middle wrap around piece to the loops and tails. Make sure to sew it closed at the ends though.
Now, thread the shoe laces through the shoe. Take a minute to play around with different ways to lace, find the crisscross pattern that fits just right.
Once the shoes are laced thread the laces through the opening left in the back of the bow.

When tying the shoes, tie a knot under the bow

and tuck the laces into the boots behind the tongue.

When tying the shoes, tie a knot under the bow

and tuck the laces into the boots behind the tongue.

Next create the small loop on the back of the shoe by cutting out two strips of pleather trim. Match up the ends and stitch the small loops onto the back of the shoes.

Lace up your new shoes, get off that toadstool and be the life of any Hat-tatsic party!


My quick list of Worbla & Thibra pros and cons (and some wonderlandiful words that I made up to describe them)
Appearance:
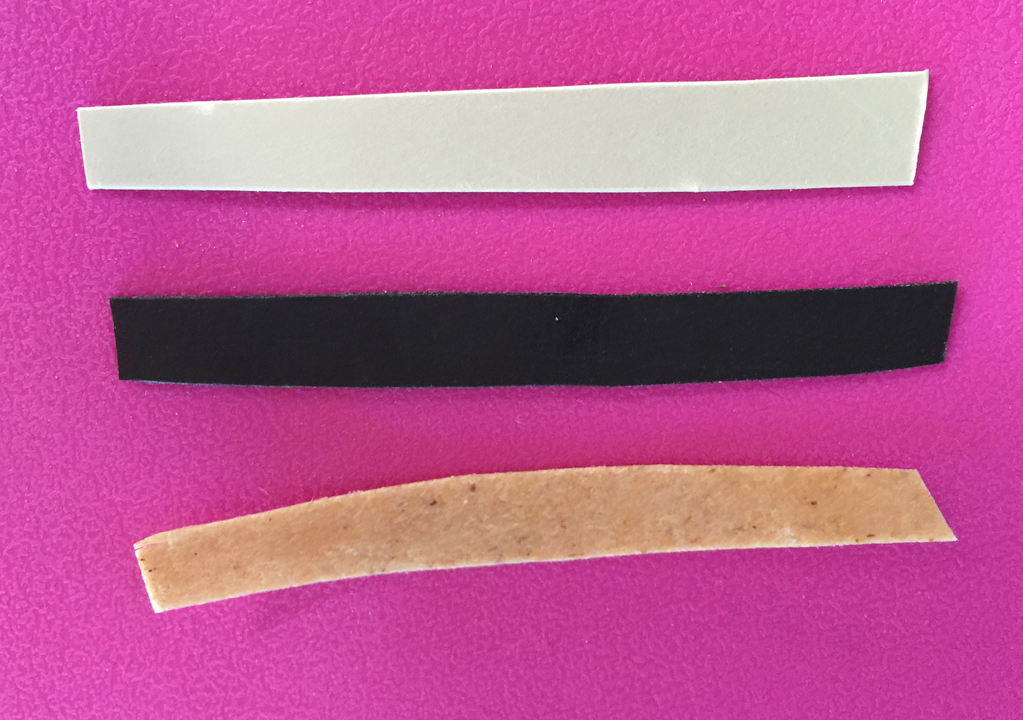 |
| Top Down: Thibra, Black Worbla, Original Worbla (I'm calling it tan) |
Thibra starts out the smoothest. Both sides are very similar in appearance. Black Worbla is smoother than the tan, with one side slightly shinier than the other. Due to its colour it is harder to see pen marks. Tan is the roughest with one side very shiny compared to the others.
Heat time:
Both black and tan Worbla begin to be workable at a higher temperature than Thibra. Lower temp isn't necessarily a pro when you live in a hot climate.... Don't leave Thibra items in your car, sadness will ensue. I don't suggest leaving Worbla in your car either, but I've done it before with no regrets.
Elasticity:

Workability:

Worbla is less sensitive to small details. While the black is much better it does not have the level of sensitivity as Thibra. Thibra will pick up finger prints! I would say Thibra is more like plastic clay when hot. The shapes above were heated once. The Thibra kitty has much smaller better shaped ears. The working time was longer as well.
Adhesion:
Tan Worbla is the most sticky, followed by the Thibra with black Worbla being the least sticky. Paying attention to which side of the Worbla is being stuck to a surface does make a difference, with Thibra it didn't seem to matter. They all stick well to themselves. Thibra gets super sticky when it is over heated, but will easily loose its shape. They all seem to stick to pleather and smooth plastic well.
Texture (after being worked with):


Tan Worbla is the most rough, followed by the black Worbla, then the Thibra which is quite smooth.
 |
| medium grit sandpaper |
 |
| fine grit sandpaper |
Paintablity:
Gesso, spray paint and acrylic stick well to Worbla. Thirbra I had trouble with my paints chipping and peeling. The surface is very smooth and almost any time I bumped my shoes the paint would start to come off. Sanding & priming helped the paint adhere better, but I do not feel it adheres as well as it does to the Worbla.
To see examples of the materials painted please view the Gallery
Tan Worbla: Lagoona, Cupid, Apple, Rochelle (no primer)
Black Worbla: Darling
Thibra: Cerise
Overall I think the products have their strengths and weaknesses. I would use them in combination rather than sticking with one or the other. Every project presents a new problem so why not use a new material?!
No comments:
Post a Comment