

What I used:
Gravity wedges
Coping saw
Sharpie
Rasp
Magic Sculpt
Sand paper
Plastic wrap
Square rhinestones
Round cabochons
Jewel-it glue
Adobe Illustrator
Printer
Adobe Illustrator
Printer
1/4 yd. fabric (fashion & scrap)
Tape measure
Sewing pins
Hot knife
Respirator
Tape measure
Sewing pins
Hot knife
Respirator
Paper
Scissors
Fabric paint (pink, silver)
E-6000
Needle
Pink thread
Needle
Pink thread
Paintbrush
2 yd. black strapping
Black Velcro
Start off by finding a hexcellent shoe base. I used a pair of gravity wedges to achieve the wonderlandiful shape of Briar's heel. Unfortunately as spellbinding as my shoes were they still needed a bit of help.


To make the vines I used the same material. Cover the shoes with plastic wrap, so you don't damage the surface of the shoe. Roll out thin bits of the magic sculpt and lay it flat on the shoe, following the designs that you sketched out earlier. Let everything dry. You can add the thorns to the vines now if you would like, but I found it much easier to wait until the vines were dry. The magic sculpt sticks to itself really well, and a small amount of water will help to smooth any blemishes. You also might have to do this in a couple sittings, since the vines should be flat on the shoes while they dry, and its a bit mad to try to do both sides at once!
Once the vines are dry and the thorns are added they can be lightly sanded. Make sure not to forget to sand the hole as well.

While mustard yellow might work on a sandwich it most certainly doesn't work with my tea, so the shoes got a couple of coats of pink fabric paint. If your shoes are a different material please check that you are using the appropriate paint. Of course if your Fairy Godmother granted you a pair of pink pumps to start, skip this step. At this point I also removed the ankle straps with a pair of scissors.
Once the upper of the shoes are painted, move onto the heel. My preference was to paint the vines before they were added to the heels. It creates less puddling of the paint, and I found it easier. Once both the vines and the heels are painted attach them using E-6000.

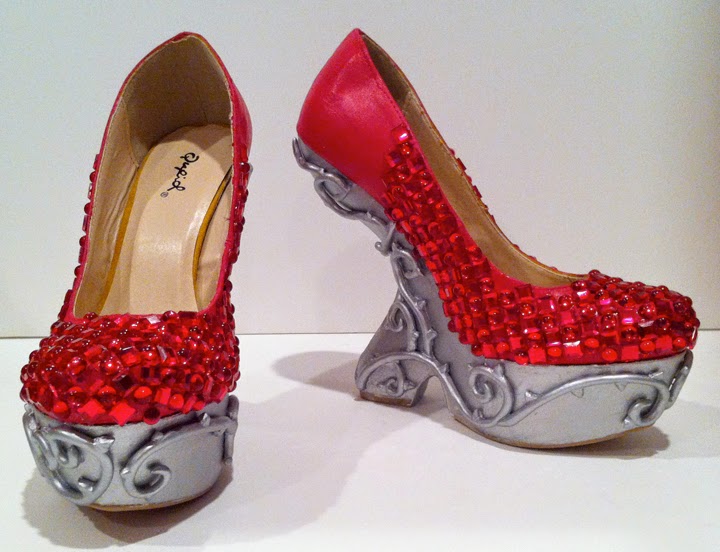
What's a happy ending without a bit of sparkle?! Usually I'm very bias towards glass rhinestones. They almost always sparkle more, and really elevate projects from looking super crafty. Despite this, I chose to use acrylic stones: they came in the sizes I needed, and I wanted my round stones not to have facets in them (which can be hard to find in glass). Plus since I bought them from the same source the colour matched. I used 8mm squares and 7 mm circles, about 225 of each type. The stones are a bit smaller than what appears to be on Briar's shoes, but remember they are hard plastic and the shoes curve quite a bit. If the stones are too large they won't conform to the shape of the shoe. Do not use E-6000 on plastic stones, it will melt the backing and they will lose their fairy tale shine. I like to use Jewel-it glue, since it dries a bit flexible.
Start by gluing squares along the center front line of the shoe, and work your way out from there alternating circles and squares. They might not fit perfectly but nothings wrong with being a little bit off at a Hat-tastic tea party.
Once all the jewels are glued into place it's time to add the ruffle to the back of the shoe. Since the ruffle appears flat where it meets the heel, I decided to use circular ruffles instead of the more common gathered ones. Circular ruffles use more fabric, so make sure that you've purchased enough. Start by measuring how long your ruffle needs to be. This length will be the circumference of the inner circle you'll make for your pattern. Then figure out how tall you would like your ruffle. This measurement plus the radius of the inner circle times two will get you the diameter of the larger circle. Get all that? I'm sure glad I
I like to make small circles like these in Illustrator, so that they line up perfectly and I don't have to worry about using a compass, which is so last chapter. You'll need to do this a total of three times one for each layer on the shoe. Your patterns should look something like this with the middle circle cut out and an opening along one part of the outside radius. My circles are very similar in size so I marked the patterns, this one is the bottom ruffle.

Once you have the patterns made, cut them out using some scrap fabric, and test for fit. I rounded the edges and angled the ends of my ruffle in slightly.

Glue the fabric to shoe using E-6000 and a few sewing pins to hold them in place while they dry. Once the ruffles are attached, they will still need a bit of work. Lightly tack the petals together moving them around to achieve the ruffled look you desire. The left shoe has been tacked the right is how it looked with just the bottom edges glued.

Now it's time for the finishing touch. Cut black strapping to length and attach it to the inside of your shoes using Velcro. I used the same method, and material (but in black), for Apple's fabelouse shoes.
If you are having trouble fitting the straps inside your shoes with the added bulk of the Velcro, try gluing one side and using Velcro on the other. It's most helpful to place the Velcro on the inside of your foot. You'll have an easier time getting it attached since the arch of your foot should give you more room.

With that, you and your shoes are sure to wake up and bring life to any party!


I love your posts and seeing the progress pictures. Can't wait to see more! :)
ReplyDelete