

What I used:
Peep toe pumps
Coloured pencils (green, gray)
Scissors
Pen
Ruler
Worbla
Twine 1/8"
Cording 1/4"
Cording 1/2"
Elastic 1/4"
Heat gun
Blue tape
Sewing machine
Quilter's cotton 1/3 yd
Needle
Thread
Snaps (size 4) x2
Fleur de lis upholstery tacks x2
E-6000
Multipurpose acrylic (Martha Stewart "wet cement," black, & white)
Paintbrushes
Tooth brush
First let's start off with a strong foundation. Gargoyles do not make rash decisions, so spend some finding the right shoes~

I choose my pumps for the overall shape, and suede on the heels. Usually I don't like using suede shoes because of the texture, but for this project I used that freaky flaw to my advantage. The suede gives the shoes a creeperific rock like texture. The shoes have a few ghoulish embellishments, but they were easy to remove. I simply cut everything off with a pair of scissors. There wasn't much holding the bow or the straps, that's the great thing about using inexpensive shoes! (For $12, these were a steal!)
Much better (though a bit too much leopard...):


From my understanding Worbla's original use was for the counter in shoes (the back part your heel is cupped in). It's pretty sturdy, easy to mold to objects, doesn't require too much heat, and sticks to itself (as well as my nicely manicured claws...sigh) really well. I had a pretty fangtatsic time using it, and would recommend giving it a try.
~When working with heat use extreme caution! When using the heat gun make sure that you protect your work surface, or it will end up looking like it had a run in with Heath Burns.. and that's just not pretty~
Using a ruler and scissors, I cut out 1/4" strips of Worbla to cover 1/8" string. I heated the Worbla using a heat gun, and carefully wrapped it around a piece of string. It turns a bit darker when it's hot enough to mold. If it gets too hot the Worbla will burn, and so will your fingers if you try to touch it. Since I didn't heat the material too much, it needed to be reheated as I worked my way down the piece.

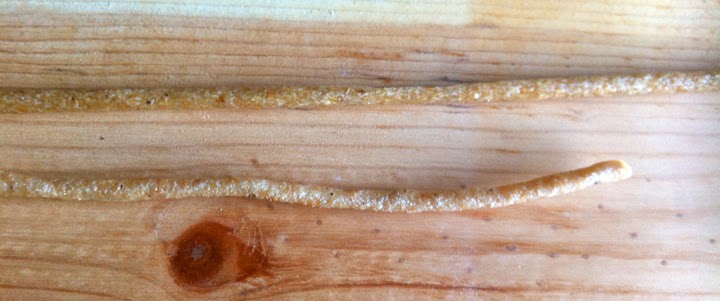
Once the string is covered, reheat it, and twist it into shape following the lines one the shoes. I pinched the tips a bit smaller and smoothed the ends to give the lines a bit of dimension. At joints I used the tip of a nail to blend the heated Worbla into itself. I repeated this step until I had all the small designs.

Once all the small designs were finished, I removed them from the shoe, so they wouldn't get warped when I added the larger details. I used the 1/4" cording for the areas around the leopard fabric, and the 1/2" cording for around the shoe. Repeat the same process for the thicker cording, just make the strips of Worbla larger. I found the larger cords stuck to the shoe fairly well due to the glue on the Worbla and the larger surface area. I had to glue the smaller details on using E-600. All the designs took about 8 hours to do, good thing gargoyles are patient!

Start off with some light gray quilter's cotton, about 1/3" yd. I cut four strips 12" x 1 7/8" along the straight grain, and four 10" x 2" strips along the bias.
(Straight grain runs parallel to the selvage edge, bias runs at a 45 degree angle to the selvage. The grain the fabric is cut on is important, it won't turn out right if you use the wrong grain.)
I marked my stitch lines with a pencil for explanation purposes, but if you don't sew much it can help you stay on track, it's getting painted over anyway....
I cut 4 pieces of 1/4" cording 9" long, wrapped the bias strips around the cording. Then stitched close the cord's edge, using a zipper foot. I folded the ends of the bias inwards 1/2", so there wouldn't be any raw edge on the ends.


Fold the open edge along the piping stitch line, insert a small piece of elastic at center back (to connect the strap to the shoes) and stitch in a ditch, or hand stitch to close. Avoid the temptation to top stitch this seam. Unnecessary top stitching is a monster pet peeve of mine. Plus I've never seen a top stitched rock before....
Leave the straps unattached for now, they are easier to finish if they aren't hanging off the shoes.
I chose to add the snaps after the straps were painted, but it is easier to sew them on when the fabric isn't covered in paint. I'm a messy painter and didn't want paint covered snaps.
Scaris is known for two things fashion, and beautiful painting, so it's time to give these shoes some true Scarisian flair! Using blue tape cover the soles of the shoes as well as the insides. Thin light coats are fabric paint's best friend. Paint too thick, and your shoes might crack or peel. It took about 3 thin coats to cover the black leopard nonsense that was my shoes..... I started with a colour that matched Rochell's shoes, and the mixed in some black or white to create highlights and shadows. The top shoe is flat gray, the bottom has been shaded. (Don't forget to add the lines up the back of the heels)

I think its easier to see the progression on my fleur de lis:

The last step in painting is to give the shoes and straps some extra texture. This is where the old toothbush comes in.
**This toothbrush should be for paint only! Don't use the one that's currently keeping your fangs clean~ It's also messy, do this outside and protect any important surfaces.**
Dip the toothbrush in paint and splatter the shoes in three colours, light, medium and dark gray.
Once it's all dried, add the fleur de lis, and snaps to the ankle straps. Then wedge the elastic on the straps between the Worbla and the back of the shoe, gluing it in place.

Voilà! You are ready to take on the Scarisian runways, or simply sit on a rooftop and enjoy the view of the city of frights.


Beautiful work, Kitty! I especially love your choice for the shoes – suede pumps. If anybody is going to try this out, I suggest that you give your suede a good clean before painting on them so the color stays on better.
ReplyDeletePeter @ Colourlock