

What I used:
Pumps
Pink shoe paint
Blue tape
Newspaper
15 mm plastic chain links ( I used about 900 to cover a pair of size 6 shoes)
E-6000 glue (a full tube)
Toothpicks
Craft foam
White glue
Water
Black acrylic
Paint brushes
Heat source (ie stove top)
Sculpey mold maker
Large screw
Instamorph
Black Velcro
Large black plastic chain (1" wide links)
Scissors
Sandpaper
**I would strongly suggest trying to find a pair of pink pumps for this project. My shoes were given to me for free, and a ghoul can't beat that price!**


Clean off any dirt of oils left on your shows with a moist rag. When the shoes are dry, take them to a well ventilated area, and give them a few coats of paint following the manufacture's instructions. I like to use Nu life shoe paint, which works well for leather, pleathers and vinyls. My shoes don't have glitter on them, its a flat holographic surface with some netting over it, so the paint adhered well. I would not use shoes with chunky glitter glued to them for this project. If your shoes are covered something else adjust your materials accordingly.

The most important part in choosing your chains is to go with your aesthetic. The chains on Spectra's shoes look really fat, almost like twist links, but my preference was to use link chain. For me, it conjures up more of a ghostly feeling. I matched the width of the links to the width of the shoe's heel, so the shoes would have one row of chains up the side like Spectra's. My chains came as individual links, and they had to be snapped together. I made one long chain to start and broke it apart as needed.

When gluing the chain, I found it easiest to start with the heel, work to the center front, move to the opposite side heel, work my way back to the front, and then finally fill in the back. Phew. It's a fairly simple process, a line of glue, and a row of chains on top, but what isn't simple if getting the chains to stay neatly in place. E-6000 dries fairly quickly, but not quickly enough. Add that to the funky angles on a shoe, and it becomes quite challenging to wrangle all the chains. I worked very slowly, only about 2-3 rows at a time, nudging the chains with a toothpick whenever they would fall out of place. I found it most aesthetically pleasing to have the chains flat around the opening of the shoe, it looked a bit more tidy then having them alternate. Make sure to give the shoes plenty of drying time before starting on the other side. It may seem like a pain, but it is really hard not to bump the drying links.

The chain will round out the toe quite a bit, so it's ok if you start with shoes that have a pointy toe.


Paint the surface of the foam with coats of watered down white glue, until the surface is smooth and the glue stops bubbling. Once dry, coat the cuffs with black acrylic paint, usually I use around 2-3 coats. Let the paint dry, and varnish with either gloss or matte, I chose gloss for a bit of added flair.
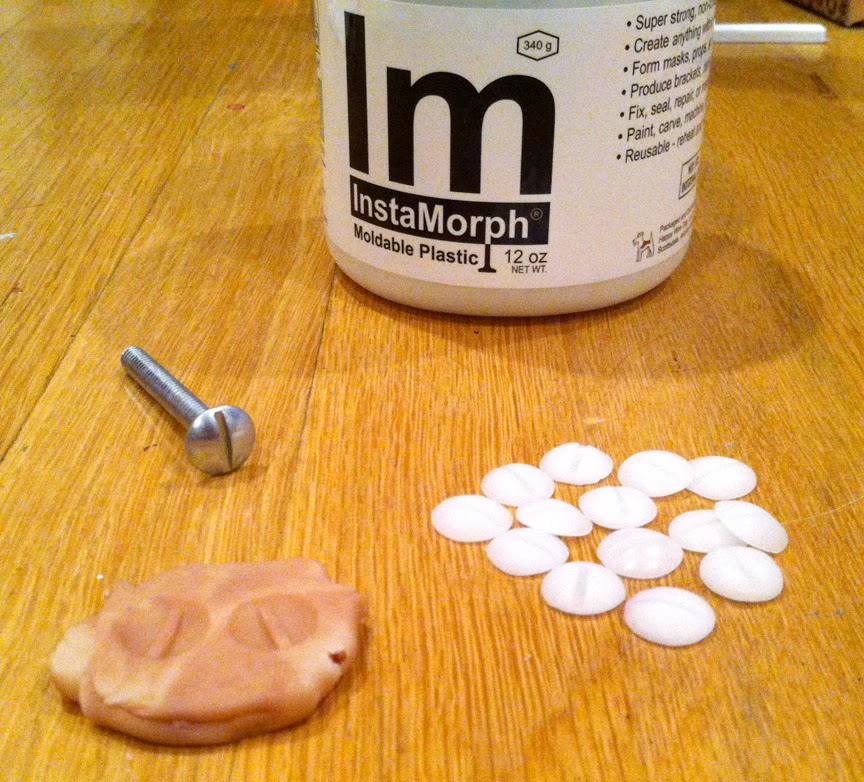
Next the cuffs need some detailing. If you look closely the little bumps around the cuffs are screw heads. They can be made these a number of ways, one would be to just cuff off the tops of a bunch of screws, but that can make the cuffs heavy and be a bit dangerous.... I wanted light cuffs and all my fingers, so I made a mold using Sculpey mold maker. Simply push the screw head into the clay as many times as you would like, bake according to the manufacturer's instructions, and just like that you have a lovely mold.

The mold can be used with a variety of mediums, but I had some Instamorph thermoplastic I wanted to try out. Personally, I think it works really well and I love how quickly it dries. I made 14 screw heads in a matter of minutes with my two molds. The heads are light weight, easy to glue and paint. I've made screw heads in the past using lightweight air dry clays, but it takes longer since the clay has to dry in the mold. Oven bake clays can also be a pain, since they can loose their shape when pulled out of the mold. It doesn't matter what perfectly imperfect material you use, just as long as you end up with 12 or so nice round screw heads (I always make extra).
Finally cut three strips of velcro (two rough, one soft) glue them to the inside of the cuff with the rough side the velcro so it will face away from your skin.


No comments:
Post a Comment